Showing posts with label Party Planning. Show all posts

Monday, January 23, 2017

Woodland Themed Baby Shower

When asked to help plan my sister's baby shower, I was so happy to have a party to plan. I absolutely LOVE themes, being creative, and doing as much of the prep without purchasing already-made supplies. I love to find odds and ends and use them to adjust my vision, sticking with the theme, but taking it to a place a bit off from where I began.

My sister was having a boy and she loves the outdoor, so the woodland creature theme seemed perfect. This theme was simple, easy to accomplish, yet so fun to be creative. I enlisted my boys to go on a nature walk, where they helped me gather pine-cones, which we used as table decor. They also scoured their plastic animal toys, as well as their stuffies, to find any that live in the forest. The boys loved helping me and I love that they spent over an hour sorting animals by habitat. Party planning and learning at the same time!

We started by decorating the rustic cake with some of the plastic animals, and placed it on a piece of a stump that my mama found, surrounded by silk leaves. It turned out so cute! We wanted to continue the theme throughout the table, so we put the pine-cones and a stuffed raccoon on the table as well. As for the other snacks, my mom made a super cute watermelon porcupine and I made donut-hole hedgehogs and Nutter Butter acorns.

This was a wonderful day of celebration for the beautiful boy who had, on his own time, had already joined our family. Everyone enjoyed the snacks, visiting with one another, and of course, snuggling the little guy.


Friday, January 20, 2017

Percy Jackson Themed Birthday Party

When my soon-to-be 6 year old requested a Percy Jackson themed birthday party, I was beyond excited. I absolutely love that he is so fond of reading that he chose a theme that is beyond his usual age group and not a typical party theme. I also love a party-planning challenge.....and boy, was this a challenge!

We started off by creating themed birthday party invites which, thanks to raising a "friend to all" type of kiddo (We are SO proud), went out to each and every child in his kindergarten class. We found a template, filled in our specific information, cut the edges off, and then rolled them and tied them up. Parents and children alike loved them!


When the big day finally arrived, we welcomed guests with a "Camp Half Blood" banner and a pouch of drachma (demigod money, really chocolate coins). Each demigod was given foam swords and shields, that my husband made out of dollar store pizza pans and Velcro strips, to defend the camp.


The house was also filled with yummy camp/god themed treats, including s'mores brownies, Zeus Jello parfaits, ambrosia (a half-blood healing food) and all the blue snacks we could find. Blue birthday snacks was a big theme throughout the Percy Jackson series. His mama always made him/gave him something blue and tasty for his birthday.


Finally, the big hurrah! The cupcake decorated for each of the three main gods of Olympus: Zeus, Poseidon, and Hades.


This was one of my favorite party themes and my boy loved every minute of it. I heard nothing but compliments for kiddos and their parents alike. Although it was difficult to track down ideas for this theme, the outcome was better than I could imagine.

I'm pretty proud of this one.

Saturday, January 17, 2015

A Train Themed Birthday

My two year old loves his "choo choos", so when thinking about a theme to celebrate his birthday, trains were an easy sell. I started planning about a month in advance. Well, I started organizing ideas in my head. Fast forward four weeks, and you would see me frantically throwing things together, hoping for the best. This was (by far) not my most thought out party, nor was it the best organized, but I think it turned out pretty well. If I do say so myself. Here are my my long-planned, yet hastily executed results.


As guests arrived at the party, they were greeted with a railroad crossing sign, compete with neon, reflective "flashers". I love to welcome party goers in a festive, fun way. It may seem like a silly touch, but I think it helps to get everyone into party mode. It transforms my normal, everyday home into "Train World".

Next I worked on one of my favorite party-planning tricks, the picture frame sign. To go along with the train theme, gifts were left in the "Luggage Drop-Off" area and the party favors were located at the "Baggage Claim". As usual, this was one of the easiest things to do, but got tons of compliments. Everyone loved the simplistic idea and that it carried on the theme.

My next order of business was food. You can't have a good party, without good snacks. I love to bake, but I find it too stressful to try to organize food, bake it, wrap up all other party prep, and then socialize freely. Birthday parties are where I tend to take a foodie backseat. I still want to provide yummy treats for my guests, so I think long and hard about what to serve, but most likely, it won't be homemade.

The easiest place to begin was drinks. Simple. Water and coffee for adults, juice for kids. Everyone was happy. To add locomotive flair, I added tags that said "Chugga Chugga" to the drinks, then tags that said "Chew Chew" to the cookies (our treat of choice).

Speaking of cookies, we have a long-running tradition of having cookies instead of cake. We love that they are so versatile. No matter what the theme, cookies work. We also enjoy that they require no prep (before or during the party). I don't have to take time out of my visits to cut the cake, serve it, and clean up after it. I can pass around the basket full of cookies, guests can choose their favorite variation.

We have found a fantastic, local bakery that is creative, fun, and delicious. Year after year, they knock our socks off! This year was no exception. We talked into their bakery, less than two weeks ago, told them the theme would be trains and that the color scheme would be red and blue, and this is what they came up with. Amazing!

On to the snacks! I started with an idea. A snack train, where each "car" carries a snack representing something that would actually be transported on a train. Obviously, I also wanted the snacks to be tasty for kiddos and adults too. I also needed a way to store these snacks that could serve as train cars. Lastly, I wanted to find a fun way to share the food names with our guests. Here is the end result:


Rectangle-shaped containers stacked with animal crackers (livestock car), Veggie Straws (lumber car), chocolate covered peanuts (coal car), pretzel sticks (log car), and fruit snacks (produce car). The train was led by a toy engine and ran on tracks made with electrical tape stuck to the counter top.


The last task at hand, was to create the parting gifts of my Teddy Bear's buddies. I wanted to stick with the train theme, through and through, so I scoured the internet to find fun train-themed gifts. Luckily I did this part early on! I found and ordered conductor whistles, added a flashlight and a cute tag reading, "Thanks for making my Birthday Party a STOP on your trip!" and tied it all up with a bow.


It was a frantic, busy, amazing day and I wouldn't change a thing! My little man had the time of his life, we spent the day surrounded by those who love our Teddy Bear, we received a ton of compliments, and it really was quite easy to throw together, even if it was VERY last minute. I love throwing parties, planning for them, decorating, and hosting, but the very best part of hosting a birthday party, is the smiles I see on the little man pictured below. It's all for you Nolan!

My little conductor


Monday, July 7, 2014

Super Hero Party

My son is a huge super hero fan. He loves them all, but his favorites are Flash and Hulk. When it came time to choose a theme for his party, he couldn't decide between the two. So, he didn't! 

I love to be creative with parties. I find nothing but pleasure in planning and throwing them. I try to be creative with theme, decorations, party favors, food, etc. Once again, I scoured my brain for ways to make sure that this Super Hero party wouldn't be a generic, cookie cutter version. My first assignment, was the food. There is an amazing bakery, here in Sherwood, that creates beautiful, yummy treats. We used them a few years back for another one of Liam's birthday parties. We asked them to create Hulk hands and Flash lightening cookies. They turned out awesome, and were a huge hit!

The next order of business was themed (yet, not canned) decorations. I went simplistic this time around. Putting out colored table clothes, napkins, plates, and silverware and pairing them with a few of Liam's toys. I put together a themed table for each of the heroes, and moved on to more important things......party favors!


I have to say, that this is one of my proudest party ideas. I'm a reading teacher. My boys love books. Normal party favors tend to be cheap toys, candy, and nick knacks that are thrown away. I wanted to make Liam's party favors useful, memorable, and worth taking home. So I went with books!

I searched local book stores, Facebook buy/sell pages, and garage sales, for new/like new children's books. I was able to come up with quite a stash for less money than the normal goodie bags would require. I displayed the book options in a decorative basket, near the front door, so as not to forget them. This also allowed the children, to flip through and choose the book that they wanted, while heading out.

To personalize the gift for Liam and his guests, I typed up and printed a little note on address labels and stuck them on the front cover of each book. Once again, our guests loved the idea! I have received more compliments on this idea, than any other. I'm so happy that everyone liked it, and I love that it promotes reading!


The last hurtle to get the party started, was an activity for the kiddos. I hate party games. Especially, for infant/toddler parties. Kids just want to play. Party games are complicated, can be difficult to organize, and they require that someone who is throwing the party, be taken away from their guests to facilitate. I'm just not a fan. In past parties, I set up a cookie decorating station, homemade playdough, Mr. Potato Head felt game, and created a punch for the prize game, You can check out these ideas at Teddy Bear Picnic Birthday Party and To Infinity and Beyond!

This time, I created bookmarks that went along with the Hulk/Flash theme. I printed them in black and white, and put markers and crayons on the same table. This way, each kiddo would leave the party with a book and bookmark that they colored, and would have a fun, calm activity to do, while at the party.

This was a super easy and simple way to throw a birthday party, and I got nothing but compliments for how it turned out. I learned that parties don't need to be fancy, expensive, and super-structured to be a hit. They just need to be well thought out and creative!

Monday, January 27, 2014

Teddy Bear Picnic Birthday Party

Since my baby boy was a wee squiggle, swimming in my tummy he has had two nicknames- Gummy Bear (given to him by his Auntie Alyssa, because she said that he looked like one in the ultrasound photo), and Teddy Bear (his middle name is Theodore, after my husband's grandfather). So it was only natural that his first birthday go along with these nicknames. In searching for Teddy Bear themed party ideas, I quickly realized that everything was for baby showers, and NOT birthday parties. Well, I wouldn't let that detour me! I had done a home-made birthday party before-my oldest son's 2nd birthday was Toy Story themed, and I made everything from: activities, decorations, signs, cupcakes, snacks, games, art projects, etc. I could do it again..........so I did.

I scoured Pinterest for ideas, then I was on the prowl for anything and everything that just might work. I don't know if I'm extremely lucky, or if planning ahead, looking in several places, and being open to changes is the answer, but it all fell into place perfectly. I love the Teddy Bear Picnic song, and we have a plethora of the stuffed scoundrels lying about our home, so once again.....I went with it.

Here is how it turned out, where I purchased the supplies, how I made the projects, and other miscellaneous things you might want to know, when planning a similar birthday extravaganza:

 Don't Forget Your Disguise!
A line in the song refers to all the Teddy Bears wearing a disguise to their big party, so our guests got to wear them too. Bear-ear hats were waiting right inside the door, with a sign reminding them to take one. They were easy to make, only required a sharpie and brown paper, and the kiddos LOVED them. They wore them all day, and many took extras home.


Teddy Bear Picnic Table
This is the "picnic" table where the goodie bags, and yummy treats were housed. Gummy Bears, sandwiches, Teddy Grahams, Trail Mix, cupcakes, and adorable bear cups to store the tasty treats, were laid out for snacking.


Teddy Bear Picnic Framed Lyrics
Also, a Dollar Store picture frame displayed a verse of the Teddy Bear picnic song. These were placed throughout the house for people to read. I tried to match the verse with the activity that would take place in that area. Now, these verses are hanging in my Teddy Bear's bedroom. What a great keepsake!

Picnic Party Favor
Each child that attended the party went home with a Teddy Bear plate, set of silverware, and a Teddy Bear storage container filled with gummy bears or teddy grahams (depending on their age). I was told by several parents that they loved this idea, because their kids were getting something they would actually use. The kids were begging to eat dinner with their new plates/silverware, so I'm guessing that they liked the idea too.

Cookie Decorating Station
This was one of the best ideas! The kids absolutely loved decorating their own teddy bear cookie. It was nice for me, because that was one less thing I had to prepare before the party, and it was nice for the parents/kids because the kids were entertained. It was extremely easy to set up, required little time, and was very inexpensive.

1st Birthday Picture Collage
I made one of these for my older son's second birthday, and it is still hanging in his bedroom almost two years later. It was a mommy-favorite, and more than anything, I wanted to do it again for my little Teddy Bear. Cut out the number needed from a cardboard box, glue/tape pictures to cover the cardboard, then hang! It's so fun to see the changes in your baby when sorting through the pictures, and it's fun to reminisce with party guests when they take a peek.
 Easy Teddy Bear Cupcakes
This is the easiest decoration idea yet! Bake cupcakes, frost, stick a teddy graham on top. Done. Quick, easy, inexpensive, and everyone loves a cupcake with a little something on top.

Teddy Bear Ice Cream
No picture of this sweet treat. Sorry! But it is also a wonderful way to make good use of that cookie cutter. We thawed, then refroze ice cream into a foil pan. Then when it was time for ice cream, we pulled out our trusty cookie cutter, and used it to "scoop" the ice cream. There was a little trial and error (1.take the ice cream out and let it sit for a bit before trying to cookie-cutter it. 2. Warming the cookie cutter under hot water first really helps), but it was so so cute, and the kiddos were so excited to get a teddy bear-shaped ice cream.

 Teddy Bear Sandwiches
These were awesome! Everyone loved them, and they were so easy to make. Since bears like fish, we made tuna sandwiches, then used the same cookie cutter (we were getting as much use of the thing as we could) to cut out adorable little teddy bears. I'm still in love with this idea, and I think I will try to do it again for future parties of various themes.
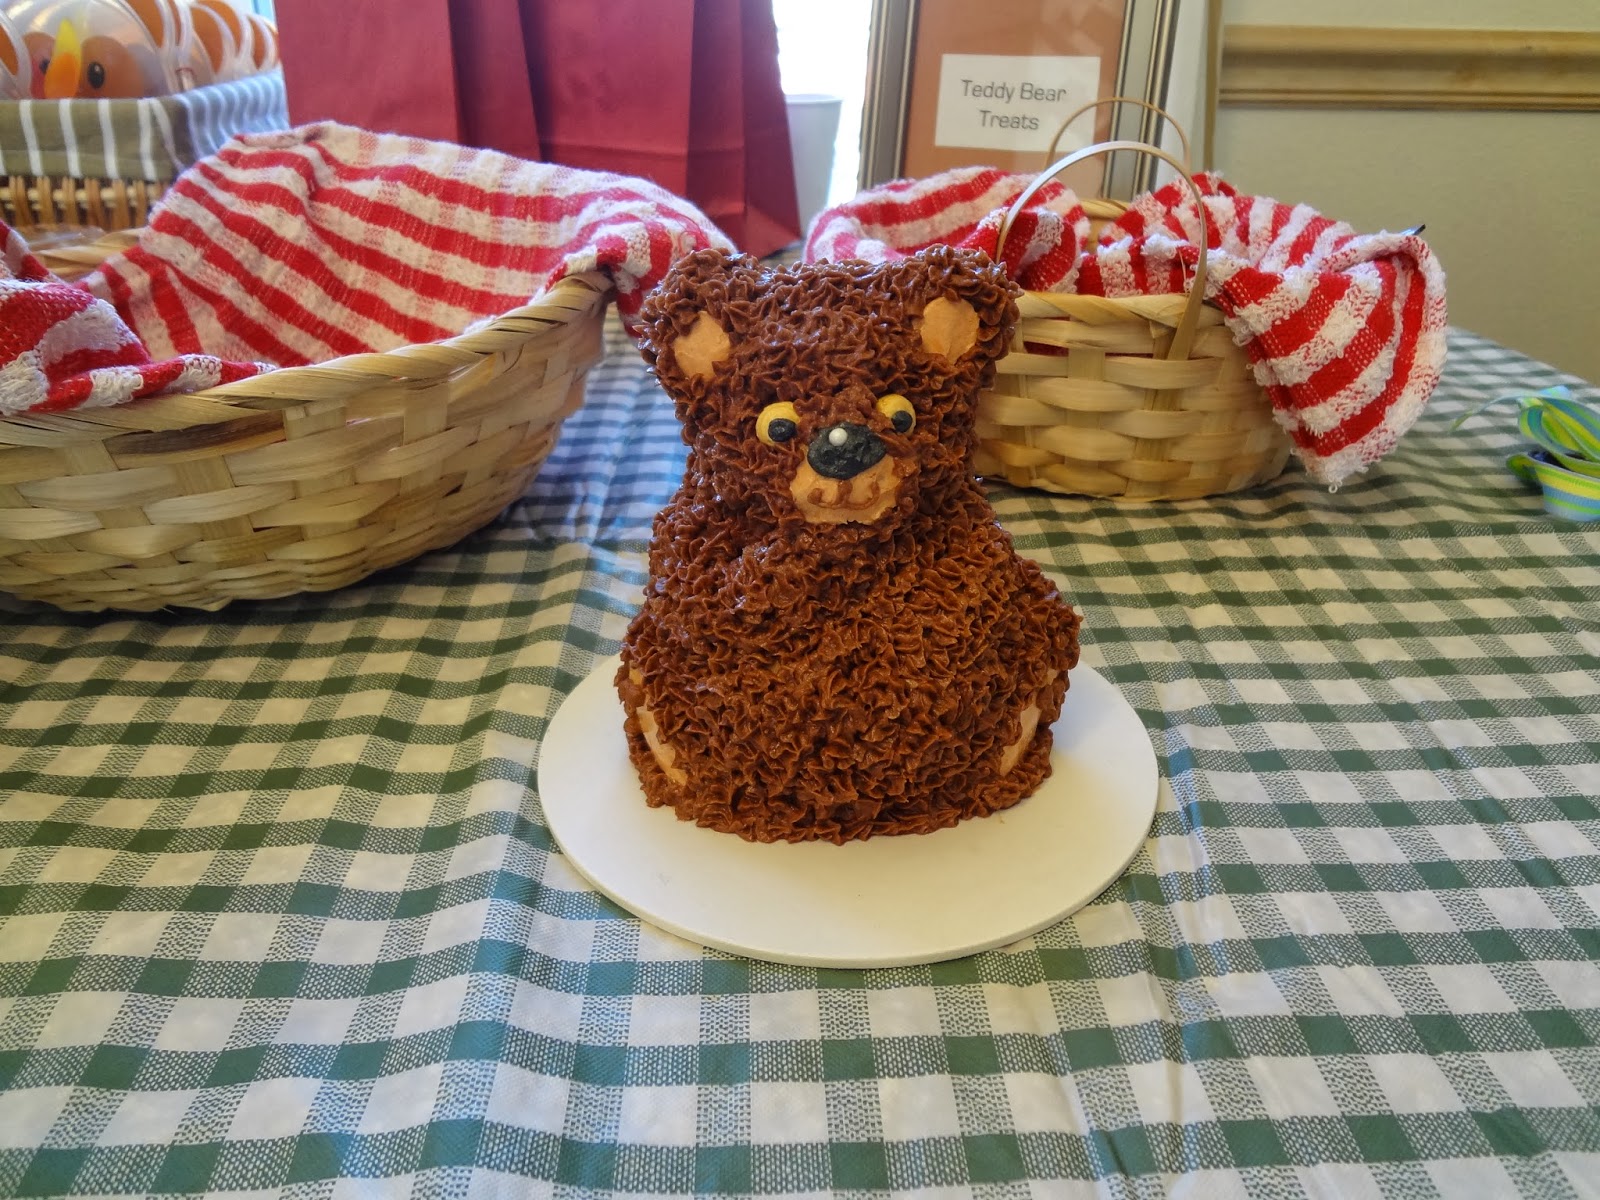
Teddy Bear Smash Cake
Everyone one year old needs his or her own cake on their birthday. We enlisted the help of the boys' Meema in making a teddy bear cake, just his size. It was perfect for our little guy, and it was oh so sweet!

In the end, I'm so glad that I couldn't find any generic red and blue checkered plates with teddy bears on them. I enjoyed making this party unique and special, and I enjoyed seeing how much everyone who attended enjoyed the little touches. More than anything, I love that I can show my little Teddy Bear pictures of this wonderful day, and tell him that his mommy did this all for him!

Saturday, October 12, 2013

Beer-Tasting Birthday Bash

Snack Buffet
Surprising my husband is never easy. I have only been successful once before, years ago. Surprising him is even more complicated when a big birthday milestone, like 30, is looming. I knew that to have a big celebration, it would have to be unknown to him, as he isn't someone who likes the limelight, and doesn't like to spend a lot of money on things like this.

Knowing that shocking him was my only option, I worked very hard and utilized every sneaky skill I have. The complication of the situation was multiplied by the fact that we moved two weeks ago, and our house is just getting organized. Luckily for me, our friends and family are wonderful accomplices, who are also very good at keeping big secrets, because the plan went off without a hitch!

Easy Beer-Themed Decoration
The theme of the party was Beer Tasting, which I knew my hubby would love, as he loves to try new brews. I asked that each guest bring a favorite beer, which helped us to have WAY more than enough to go around, several options for everyone to try, and cut the cost a bit for me. It was a hit! Everyone enjoyed the evening, loved the tasting aspect, and it was super laid-back (just like Joe). I added to the theme, by having quite a few pub-like snacks: pretzels, peanuts, beef jerky, chicken wings, and little smokies.

Joe is not a huge cake fan, he usually requests banana cream pie, so when we tasted a cupcake version at one of the many summer festivals we attended. I kept the contact information for several months with every intention of ordering several dozen for the party. I wrench was thrown into that plan, when I contacted the baker a week before the party, and she informed me that her business had moved several hundred miles away, and she would be unable to supply the treats.

Banana Cream Pie Cupcakes
I scoured  my cookbooks, Pinterest, and several other recipe websites, hoping to find something that would have a similar affect. After days of looking, I bagged the idea of using someone else's recipe, and created my own version. I have to say, they turned out pretty tasty, and looked pretty awesome (until the whipped cream started to weep). My picky, cake-hater, loved them! Unfortunately for me, over-estimated the appetites of our guests, and make about 30 too many. At least they were mini-cupcakes, so really that isn't too bad. Joe isn't complaining though! Both he and Liam, have already had a few for breakfast. If you would like the recipe, check out Banana Cream Pie Cupcakes.

It turned out to be one of the best parties I have planned, and Joe was not only completely surprised, but we are so happy and thankful to have such wonderful people to share such a big milestone with.
The Big Surprise!

Sunday, April 22, 2012

To Infinity and Beyond!

Liam turned two earlier this week and his birthday party was today. It was wonderful! So many of our amazing family and friends came to help us celebrate a huge milestone in our son's life. In preparation for this day, I have been getting crafty! For the past few weeks, I have been working on project after project to help make his big day a special one. In this blog, I will share all of the fun ideas that I had, borrowed, and just plan stole from friends and the creative geniuses of Pinterest.
My first assignment was to create signs that would not only reflect the Toy Story theme of the party, but also inform guests of activities, food, and where the party was taking place. I started this project with the cardboard that was left over from our closet/bedroom renovation project (we were lucky to have so many boxes). I used graphics found on the internet and Toy Story products to draw the words on the cardboard, then I used a box-cutter to cut them out, and painted them using the colors shown on the logos.
The door to the playroom
Over the island in the kitchen

Welcoming guests at the front door

Next, I used felt to create a "pin the body parts on Mr. Potato Head" game. I bought one small sheet of felt in each color needed, then cut out the body parts. Last, I glued the prickly side of a velcro strip onto each feature. They turned out great, and the kids loved it!

I also made a beautiful collage of all my favorite pictures of Liam, shaped in the number two. I started by drawing a large, block number two on a large piece of cardboard. Then I used a box-cutter to get rid of the edges. Finally, I was able to tape each picture on to the cardboard, being mindful to keep the shape. This is my favorite project for sentimental reasons.


The most time-consuming, yet most rewarding project, was the gift bag punch box. I once again, started with a large cardboard box. I used a box-cutter to create 15 holes on either side of the box. I didn't care if the holes looked nice, they would be covered anyway. Then I had to use another box to create shelves on the inside. I used one piece that was large enough to go width-wise and top to bottom, to create an anchor for the shelves. Then I cute four pieces that had the same dimensions as the inside of the box, cut them in half length-wise, and taped them to the anchor piece. Next I put two pillars between the holes to divide each bag from the others and to support the shelving.


Once the inside of the box was complete, it was time to make it look pretty. I chose to cover the whole box in some balloon wrapping paper I already had. But I needed to create the nice, neat holes first. I measured the distance from the bottom of the box to the first hole, then measured the same on the wrapping paper. I used a tupperware lid to trace the circles, then cut each one out. When I was done with this, I taped tissue paper onto each row, covering the holes. I highly suggest doing this after creating the holes on the paper, so that you can see the holes on the box, and can check your measurements.


I realized when I had finished, that there was a pretty good-sized space left where you could see the box. Instead of going out to buy more paper, I created a mosaic from the scarps cut from the circles. It turned out really nice. I chose to create the punching holes on both sides of the box. This is not needed, but we had more than 15 kiddos at the party and I decided to use it to dole out the prizes for the games as well. The kids LOVED this! It was a great way to make the gift bags even more fun.


My last project was to make stary sky play-do. I have never made play-do before, but it turned out awesome! I used black and blue food coloring and silver, white, and blue sparkles. It went great with the Buzz Lightyear theme.

There were also some projects that I did not necessarily "do", but had a part in. My husband's step-mom is a wonderful baker and is amazing at cake decorating, so I designed a cake and she made it for us. Once again, I was happily surprised when my idea turned out better than I thought (quite possibly due to Clair's fantastic skills). The food we chose was also well thought out. I watched the Toy Story movies to find snacks that would go along with the theme. We ended up with chips (cool ranch and BBQ), cheese puffs, and pizza (of course).


I have to say, that putting this much effort and time into one event was exhausting, but well worth it. Liam's smile and comments from our guests, told me that all of my effort was noticed and appreciated.